Adobe Creative Cloud All Apps –  Patch

Adobe
Deal Score+125
Rs. 0 Rs. 75,000/- GET IT FREE
Deal Score+125
Rs. 0 Rs. 75,000/- GET IT FREE

Please read the guides thoroughly before taking any action !!

⭐ DOWNLOAD DIRECTORY

1st You have to Download Adobe Adobe Creative Cloud


Adobe Adobe Creative CloudAlways use this one first as priority

 Creative Cloud (CC) – Adobe Alternative Download – Use if have issues with Adobe Download

Then Download Patch File


Adobe Patch – Direct Download

Adobe Patch Mirror – Mega Drive Download

Instructions to install CC + Adobe Patch

Adobe Creative Cloud ඩව්න්ලෝඩ් කර ගැනීමට පලවෙනි ලින්ක් එකේ තියන Direct ලින්ක් එකෙන් යන්න, එකෙන් බැරි උනොත් දෙවෙනි ලින්ක් එකෙන් ගිහින් “Windows | Alternative downloads” කියන තැනින් ඩොව්න්ලොඅඩ් කරගන්න. 

මේ වැඩේට ඔයට Adobe එකේ Free Account එකක් ඕනි. එකක් නැත්තම් Adobe එකෙන් Free එකක් දාගන්න පුලුවන්.

Adobe Creative Cloud එක Install කරනකොට Adobe Genuine Service (AGS) එකත් දාන්න කියල ටික් එකක් තියනව අනිවරෙන්ම එක ඔෆ් එකෙ තියෙන්න ඔනි. 

Install කරාට පස්සෙ Menu > File > Preferences and in the “General” tab එකට ගිහින් මේ දේවල් තුන ඔෆ් කරන්න

Launch Creative Cloud at login;

Run Creative Cloud in the background after closing;

Automatically keep Creative Cloud up to date.

ඊට පස්සෙ Menu > File > Quit Creative Cloud යන්න.

2. අලුත්ම AdobePatch එක ඩව්න්ලෝඩ් කරගැනීම 

AdobePatch එක ඩව්න්ලෝඩ් කරල winrar නැත්තම් 7zip එකෙන්  Unzip කරගන්න. මේක 100% ක්ම virus  නැ, බයවෙන්න දෙයක් නෑ ඒත්, සමහර වෙලාවට antivirus එකෙන් කියනව මේක virus එකක් කියල. ඒම උනොත් antivirus එක ටිකකට ඔෆ් කරන්න. 

3. AdobePatch එකෙන් Creative Cloud එක පැච් කර ගැනීම

AdobePatch එක ඇඩ්මින් විදිහට Run කරන්න ඕනි. 

ඊටපස්සෙ පැච් ඇප් එකේ Options tab එකට ගිහින් “Always search for ACC” එක අනිවාරෙන්ම ටික් කරලතියනවඩ බලන්න, නැතිනම් එක ටික් කරල යට තියන “Save Options” කියන බටන් එක ඔබන්න.

ඊට පස්සෙ අයෙත් Main tab එකට අවිත් “Search” කියන එක ඔබල එක වෙනකල් ඉන්න.

එන ටිකේ Creative Cloud එකේ ෆයිල් විතරක් ටික් කරල Patch කියන බක්න් එක ඔබන්න

ඔයා Creative Cloud ඇප් එක Update කරන හැම පාරකම මේ විදිහට ආයෙත් පැච් කරගන්න.

4. Creative Cloud එක ඔපන් කරල ඇප් Install කිරීම

Creative Cloud එක ඇඩ්මින් විඩිහට ඔපන් කරගන්න.

සයිඩ් එකේ මෙනු එකේ තියනව “APPS” කියල ඒක ඔබන්න.

ඔයාට පාවිච්චි කරන්න ඕනි ඇප් ටික ඔක්කොම දාගන්න.

ඒත් තාම ඒ දාගත්ත ඇප් එකක්වත් ඔපන් කරන්න එපා.

ඔනි ඇප් ටික දාගෙන Menu > File > Quit Creative Cloud යන්න.

Adobe Genuine Service (AGS) මේක Install කරන්න කියල මැසේජ් එකක් අවොත් “Decline” කියල දෙන්න.

5. දාගත්ත ඇප් ටික පැච් කරගැනීම

ආයෙත් AdobePatch එක ඇඩ්මින් විදිහට ඔපන් කරගන්න, කලින් විදිහටම Options tab එකට ගිහින් “Always search for ACC” කියන එකේ ටික් එක අයින් කරල “Save Options” යන්න.

ඊට පස්සෙ අයෙත් Main tab එකට ඇවිත් Search බටන් එක ඔබන්න,

එතන ඔයා දාගත්ත ඇප් ටිකේ ෆයිල් ටික ටික් කරල Patch කියන එක ඔබන්න.

ඔයා ඇප් Update කරන හැම පාරකම ආයෙත් මේ විදිහටම පැච් කරන්න.

ඇප් Creative Cloud එකෙන් ඔපන් කරන්න එපා!! Start Menu එකෙන් හොයල ගත්තට කමක් නෑ. නැත්තම් Shortcut එකකින් ඔපන් කරන්න.

එච්චරයි, දැං ඉතින් ඇප්ටික පවිචි කරන්න පුලුවන්.

  1. Download & Install Creative Cloud

Always use Adobe Download first as priority when you require Creative Cloud.

Have issues with not being able to download Creative Cloud using Adobe Download, switch to using Adobe Alternative Download and obtain Creative Cloud from “Windows | Alternative downloads” dropdown, if still failing to download for you even then, you can make use of the Backup Download.

Adobe Account Required for Sign-In During Creative Cloud Installation:

This requirement by Adobe cannot be avoided and ensures you have access to your subscription and all associated services.

You can create a free account using your email or a temporary email (search “temp mail” on Google; any should work), or use an existing account. However, do not use an account with ongoing or previous subscriptions, or one that has ever started a trial (to avoid problems).

If you use a temporary email, make sure that you keep the temporary email inbox open long enough to receive your email verification from Adobe, otherwise, you might have to create a new free account later on if you are asked to verify your account and no longer have access to the temporary email.

During Install:

Ensure that you are logged into your device as an Administrator, if you are using a standard, guest, Microsoft, or local account, switch to an Administrator account.

If shown – Account authentication window – Quit your install and change settings to avoid issues during installation as here:

User Account Control (UAC) must be turned on, run Creative_Cloud_Set-Up.exe as Administrator.

If shown – Do NOT install Adobe Genuine Service (AGS) – if not shown, continue anyway.


Once installed go to Menu > File > Preferences and in the “General” tab disable the following:

Launch Creative Cloud at login;

Run Creative Cloud in the background after closing;

Automatically keep Creative Cloud up to date.

Once that is done go Menu > File > Quit Creative Cloud

  1. Download the latest Adobe Patch in the guide – extract ALL contents from zip

It is advised to fully disable your used antivirus as it can sometimes block the AdobePatch download.

Once you have the GenP.v3.5.0-CGP.zip file, right-click and “Extract All” contents.

⚠️ Possible Problem & Solution – Step 2

⚠️ Antivirus programs may sometimes block the download. You should disable your used antivirus before downloading. This will fix the issue of GenP not being able to be downloaded.

⚠️ Antivirus programs may sometimes delete or move files into quarantine. You can either whitelist GenP as safe or disable your used antivirus before extracting. This will fix the issue of .exe not showing in the folder after extraction.

Whitelisting GenP as safe is always the preferred option to use, however you can just disable your used antivirus for a temporary period if you prefer, always remembering to re-enable it once done afterwards.

Disabling Windows Defender: Go to Settings > Privacy & security > Windows Security > Virus & Threat Protection and toggle off the options there, if it is still not allowing it, you also need to go to Settings > Privacy & security > Windows Security > App & browser control and toggle off the options in Reputation-based protection

3. Patch Creative Cloud with AdobePatch

Note that you should be running AdobePatch as Administrator.

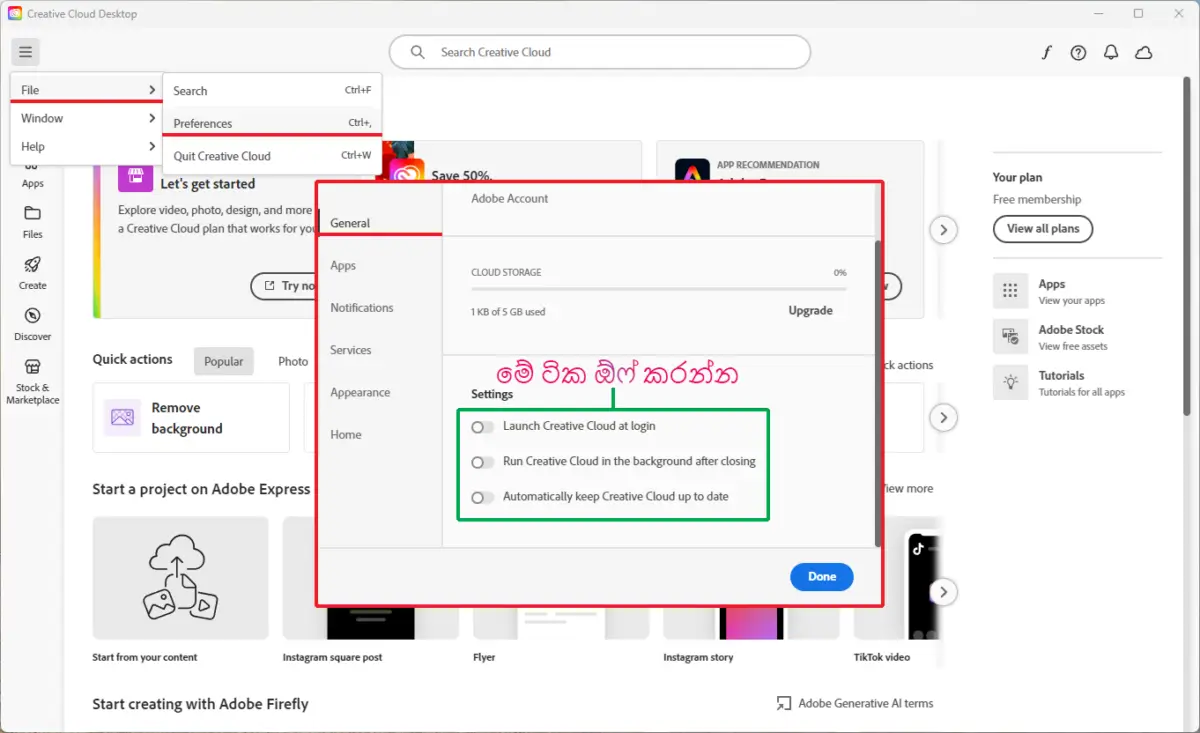
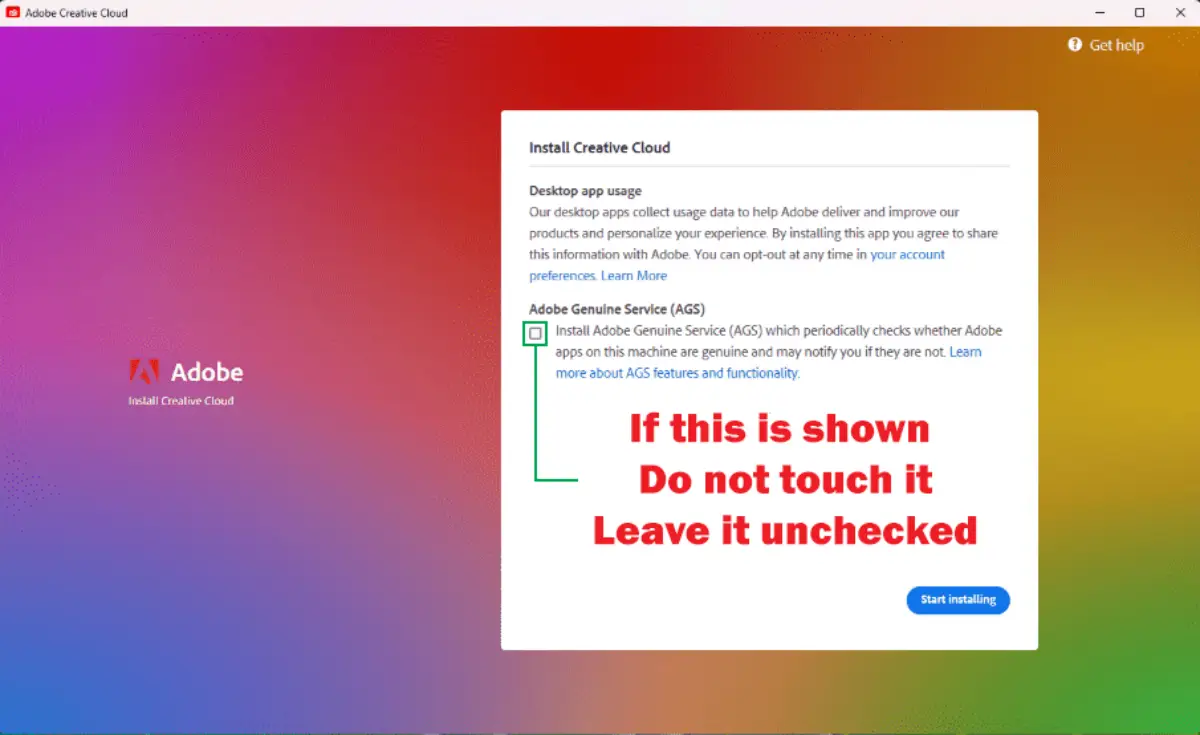
You are advised to always make sure that you close CC before patching by going Menu > File > Quit Creative Cloud to close it fully. However, if you did leave CC open when you use GenP, it will automatically close CC for you.

Open AdobePatch.v3.5.0-CGP folder and run AdobePatch 3.5.0.exe.

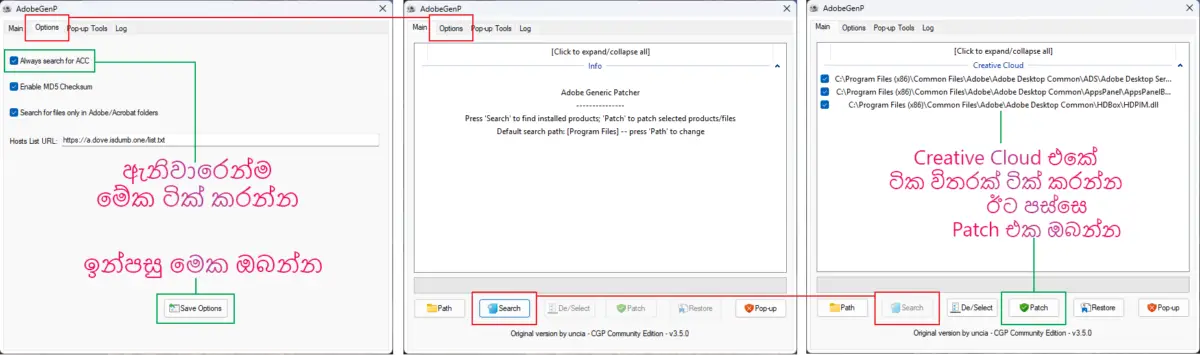
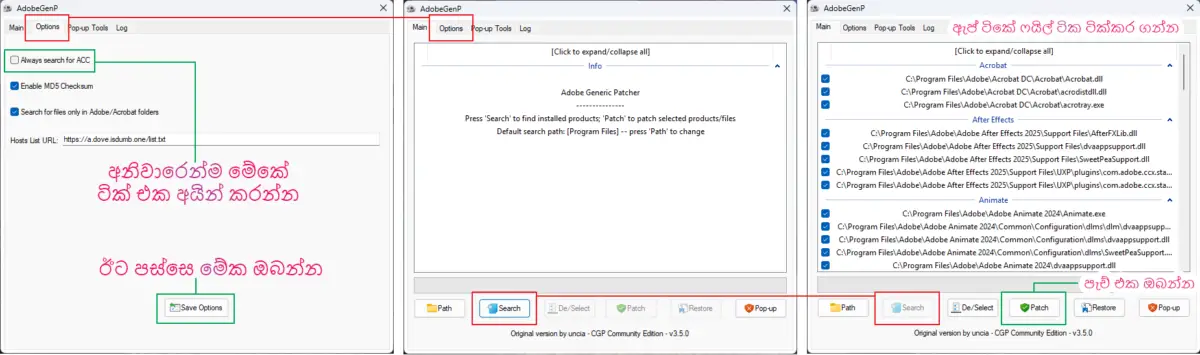
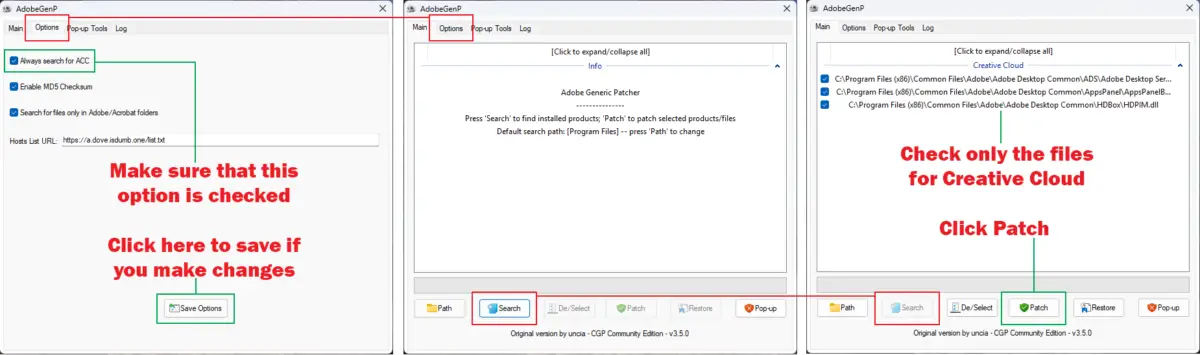
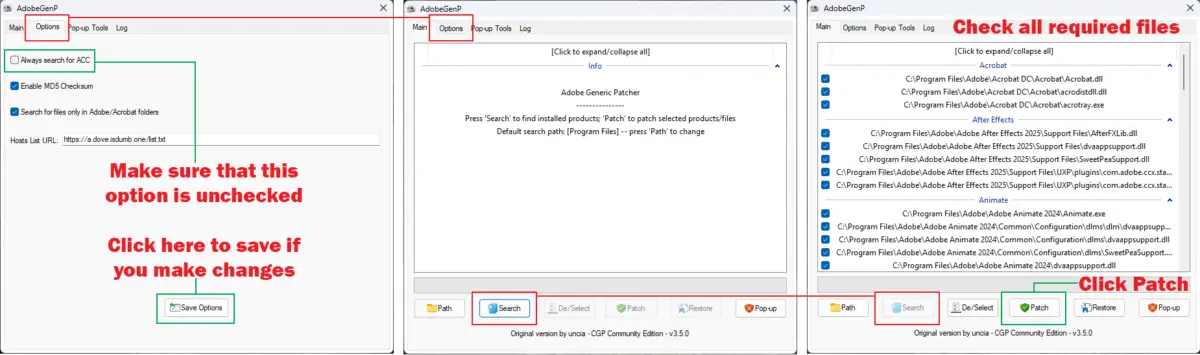
Go to Options tab and make sure “Always search for ACC” is checked, if it is not then check the box and click on “Save Options”.

For the other two Options, you can leave them as they are: Enable MD5 Checksum (Checked), Search for files only in Adobe/Acrobat folders (Checked).

Go back to Main tab and click on “Search” and wait for it to return the results.

Check the three files for ACC at the top.+

+ At a later date when you just want to repatch CC after updating it, you can uncheck all other files using “De/Select” and only check the three files for ACC at the top.

Click on “Patch” and let it run and finish.

The patch runs automatically and performs all the necessary actions (Do not touch anything until done).

You will know it’s finished when it switches to the Log tab (this is only informational; continue with the guide).

💁‍♂️ Every time CC gets updated, you must repatch it with AdobePatch again.

⚠️ Possible Problem & Solution – Step 3

⚠️ If you’re having issues opening GenP, ensure you’ve followed step 2 and either whitelisted it or fully disabled your used antivirus.

⚠️ Required files for patching are not shown after using Search; only Creative Cloud is listed:

Either click on the “[Click to expand/collapse all]” banner at the top, click on the “v” on the right, or double-click the Creative Cloud title bar.

⚠️ Fails to find CC or it takes a long time to search:

You can manually use “Path” to select Adobe Creative Cloud in C:\Program Files\Adobe, so the path shown in GenP is now set to C:\Program Files\Adobe\Adobe Creative Cloud, after which you do “Search” and “Patch” as mentioned above.

⚠️ Fails to find CC files needed for patching:

In rare cases, GenP fails to find your CC installation automatically and opens up a new File Explorer window requesting you locate the required files to patch individually.

If this happens, you’ll have to select the files manually; they are located in these directories:

C:\Program Files (x86)\Common Files\Adobe\Adobe Desktop Common\AppsPanel

C:\Program Files (x86)\Common Files\Adobe\Adobe Desktop Common\ADS

C:\Program Files (x86)\Common Files\Adobe\Adobe Desktop Common\HDBox


  1. Open Creative Cloud > Apps > Install

You are advised to run CC as Administrator

Go to CC location: C:\Program Files\Adobe\Adobe Creative Cloud\ACC.

Find Creative Cloud.exe, right-click on it, and select Properties > Compatibility.

Check the box for “Run this program as an administrator”, then Apply > OK.

On the side menu, if you click on “Apps”

You should now have the install button. Install all the apps you want, wait until everything is installed.

DON’T OPEN ANY YET.

Once everything you want is installed, go to Menu > File > Quit Creative Cloud

If this AGS popup is ever shown whilst CC is open – do NOT install AGS (Adobe Genuine Service), – check the box for “Don’t show again” and choose “Decline”.

5. Run AdobePatch on the installed apps

Note that you should be running AdobePatch as Administrator.

Open AdobePatch.v3.5.0-CGP folder and run AdobePatch 3.5.0.exe.

Go to Options tab and check that “Always search for ACC” is unchecked, if it is not then uncheck the box and click on “Save Options”.

For the other two Options, you can leave them as they are: Enable MD5 Checksum (Checked), Search for files only in Adobe/Acrobat folders (Checked).

Go back to Main tab and click on “Search” and wait for it to return the results. (it will look at the default locations in C:) – (The “Path” is if apps were installed somewhere else; most will never need to use this option).

You can de-select the respective paths if you have any programs you don’t want to patch.

Finally, click on “Patch” to run the patch on the apps and wait until it’s done.

💁‍♂️ Every time the apps get updated, you must repatch the respective apps again with AdobePatch.


6. OPEN THE APPS THROUGH THEIR .EXE and NOT FROM Creative Cloud directly

Be aware that you are free to pin apps and open them from the taskbar, start, .exe, shortcut, etc.

Thats All Enjoy!!!

Tags:

1 Comment
  1. නියමයි, මාත් දාගත්තා. කොහොමද කරන්නෙ කියල WhatsApp එකෙන් හැමදේම කියල දුන්න.

Leave a reply

iSOFT
Logo